June 26, 2011

Casualty Cosplay, mobilize!

Logging in...

Room name: Casualty Cosplay's costume crafting corner...

Two active members, one visitor...

Loading pictures...

Yoki: The prints are done. Now we only need to fill the gaps.

Hiron: What gaps? Where? In the insignia?

Yoki: Yeah, the stencil is not perfect.

Hiron: *stares at the picture of the insignia, then the stencil* Is it bad that I don't see the difference?


Yoki: *watches how Hiron puts on the black gloves* ..That's so creepy.

Hiron: *Megatron's voice* Come here Starscream, we got some unfinished businesses~.

Yoki: *Starscream's voice* Slagging no...

Hiron: Seriously, you need to learn how to pose like a lady. Look, twist your body like this and make a curve. *gives an example*

Yoki: Umm, like this? *tries to mimic and fails, totally*

Hiron: Okay... Good... Now loads of practice with that!


Yoki: If they could hold hands?

Hiron: ..Is the inner fangirl getting loose?

Yoki: I've no idea what you are talking about...

-yoki, out

June 24, 2011

"Oh, how it pains me to do this!"

With the words of slightly lunatic back stabber and probably the most ill-used and unreliable second in command, I'll now present our up-coming costumes for Kawacon.

Princess Megs and her loyal servant Lady Star.

One boring afternoon I took a pencil and started drawing. Yoki being a Transformers fan and I'm also but in smaller scale, we've had few discussion about various themes around transforming robots. One circled around holoforms or human forms, I'm not sure which one is appropriate term. The result was these lady birds. I snapped a photo from the drawing with my phone and send it to Yoki, whose reply was: "...You have been officially infected by tf holoforms! Femme holoforms... Potential Kawacon duo~? :3"


And then after Desucon I found myself drawing mini shorts patterns. Now that I think of it, after agonizing work week, think I might have made too hasty schedule for the costumes. I really wanted to get over them quickly, because every passing day is off from making our competition costumes. The hurry have manifested as temper problems and common crankiness.

Yoki might think different, but I actually enjoy working with the costumes, because it's nice for a change to actually design something! Or modify, because half of the work was done already. I just had to transform (heh) blocky metal design into soft forms and fabric.

If the mood problems are forgotten, things are looking quite good. I only need to make Lady Star's legs and Yoki have her wings and head accessories under construction. Also our wigs needs some attention on styling department.

Talking about wigs, most disgusting thing happened today when we were trying the wig with the extras on Yoki. I tried to comb the wig from the forehead with my fingers, but actually stuck my thumb on Yoki's eyeball! It was squishy!


Because of Midsummer night celebration I'll have a free day from work tomorrow, which we will use finishing the costumes. We started with the costumes last Sunday, the same day we got back from Desucon. I took responsibility of patterns and sewing as usual. Yoki handled prop building and groundwork, because she has loads of knowledge from the source.

Maybe the costumes have something to do with a certain premiere here in Finland... Who knows?

June 22, 2011

Quick costume overview from Desucon

Photo by Petri Haikonen

I'm going to write more about our Desucon experience later. Currently I'm possessed by crazy cosplay frenzy for two reasons. Last Saturday the preliminary date for World Cosplay Summit was released and I somehow found myself promising Yoki that we will quickly piece together new costumes for Kawacon. It was weird to dig up patterning paper and references almost immediatelly after un-packing freshly debuted costumes!

Our Jedis were probably the most comfortable costumes we have worn, but still they got some minus sides. The capes were hot as hell! Because the weather changed from cloydy and rainy to sunny, we strolled in civil clothes on Sunday. We desided that Luminara and Barriss will be counted as spring/fall costumes from here on.

Next to hotness one minor problem was that our hems got stepped on them few times. Next to being comfy the costumes were easy to wear. Meaning that we didn't need worry about fastenings failing. They were thought through and well secured. Well, except the lightsaber hilt D-rings, which both came off within the first hour.

In some previous post I already mentioned that there is still some work ahead with Luminara's costume. I need to darken the cape fabric, becase it's way too brown. Before Desucon I just didn't have time to concentrate on dyeing it. I'm also going to weather the cloth and bracers. And I need to come up with better solution for the D-rings. Yoki's costume could actually be regarded as ready. I might adjust the cape a bit, but next to that I can't think of anything else.

Last, but not least I want to thank everybody who took a photo from us and especially the ones who stayed and changed few words with us!

June 16, 2011

Time for the check list

The title subtly indicates that I got the costumes ready in time! This is really something. Usually we got some gluing and hand-stitches to do on the night before or preferably on the con-morning. Last things on my to do-list were fastenings for the capes and Luminara’s wrist bracers and shortening Barriss’ scarf.

I ruined four hearts before I succeeded!

Tomorrow morning I’ll start the packing process. I got my check list ready and post-its around. They remind me from packing the tickets also. Then I just wait Yoki to arrive and then we’re off! See you soon, Desucon!

Edit: Bhah, I forgot I had to paint one tiny area on the end of Barriss’ lightsaber hilt! Well, something for Friday morning. It would've been inappropriate just to chill out.

June 11, 2011

Traveller inspired collaboration

At their best, cosplay photographs act like any successful piece of art; they enlighten feelings, memories and stories. We have few times been truly dumbfounded, when we’ve had contacts from other countries, people with whole different backgrounds about our cosplay photos. Especially Yoki’s Snufkin have had positive reactions, which we will never forget. One of them was from Netherlands.

Piotr send us e-mail and asked if he could use one of the photos from our winter photoshoot for Snufkin. He is planning a hitch-hiking trip around the world and Snufkin has been his favourite childhood character. No wonder, I say. He also mentioned that he has read all Moomin books by Tove, so we were basically involved with Moomin maniac similar to ourselves. Thus, we were really happy to let him use our work on his blog's header.

Piotr’s blog, One smile journey can be found behind the link. We wish him best of luck for his adventure!

June 5, 2011

Progress of Barriss' costume

It has been quite hectic for the last few weeks but we have managed to make progress with the jedi duos costumes, which is relatively good when considered the convention we're going is two weeks away. I only wonder, how we always manage to pick the most hottest costumes for summer.

Why so sad face? Answer: very persistent summer flu.

"You don't know the power of the Dark Side... Whoops, wrong side. "

Hiron's ultimate pose called: The Realisation of Passage of Time. Potential title for a Prince of Persia game.

-yoki, out

May 29, 2011

Tiny takes from the weekend


While I sewed Yoki’s costume she worked on her belt buckle. Sadly we didn’t take any photos from the process, but maybe next week Yoki will make a post about her accessories.


After some minor hood problems I finished Barriss' cape. The fastening is still missing and I need to do a separate collar piece. The print looks great!


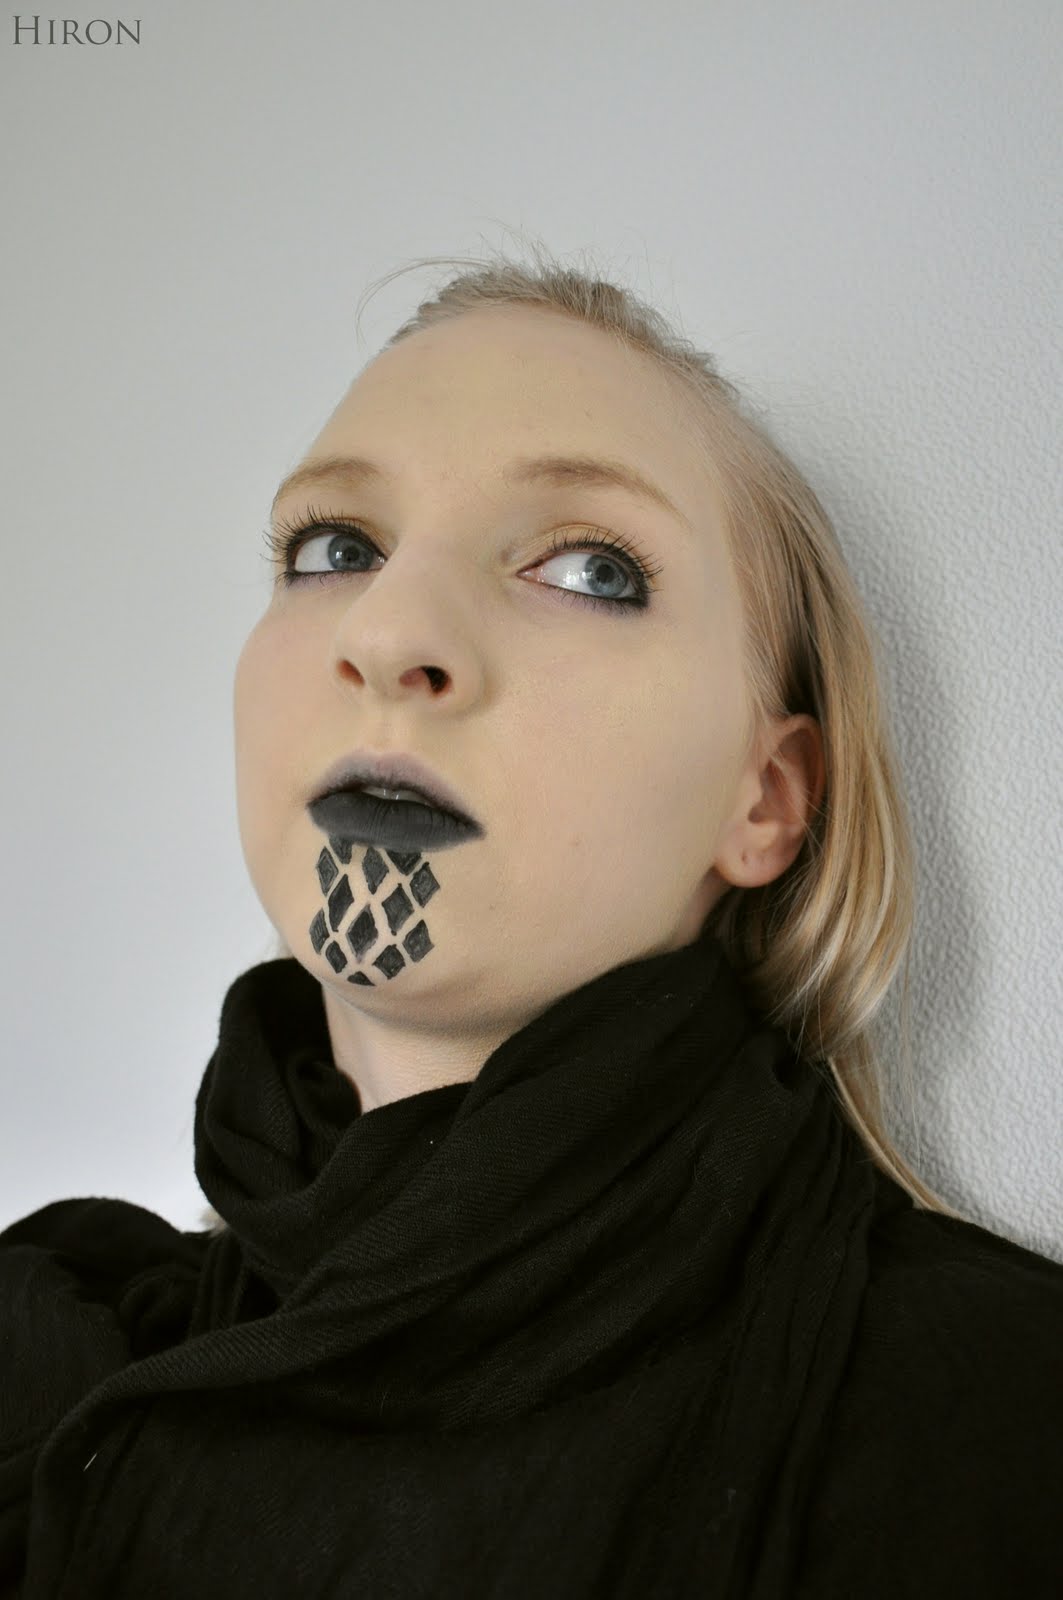
I tried Luminara's make-up. I’m really happy how the lips turned out, but the diamond markings still need attention. And I think I bought eye shadow with too subtle golden tint.


Yoki looked grumpy. “Get out of my lawn”, she yelled.

May 19, 2011

Luminara's headgear- The dome


I realized yesterday that Desucon is only a month away. Inspired or horrified of the closing convention I started with Luminara’s headgear. I dug up the base I had prepared in February as a refreshing crafting project between Snowtrooper’s construction. The materials I used for the dome part was corrugated cardboard, lots of masking tape, modelling “clay”, tricot and flannel for support and padding and wool.


I took advantage on our Snowtrooper helmet dome mold for the cardboard skeleton. I actually had done one dome before, but because I didn’t have anything to shape it over it became too big and bulky for my taste. With the mold I was able to get the shape close enough and with little tweaking and trying it on it finally took nice, fitting form. I used hot glue and masking tape to keep the structure together.


Next I took about 250 grams of modelling material and rolled it to thin sheet. Then I covered the dome with the clay substitute. Then I left the dome to dry before the next step. After the clay is dry, it’s almost impossible to alter the shape anymore. The cardboard dome was correct size for me, but it was bit too round while my head is more oval. I padded my wig head with plastic to fit my head size and taped the sides down to create the right shape on the rim.


After the clay was dry I covered the dome with tricot and applied glue-water mixture all over. The tricot smoothed out some of the inconsistencies in the clay and because I was too lazy to sand it I added flannel on the front to hide all the remaining bumps. I only applied glue on the edges to keep the fabric soft. I also didn’t cover the whole dome, because the back part will not be visible under the, uh, curtain..?


I had bought the only brown wool with smooth surface available on the local fabric stores. Not the best time of the year to buy wool, I say. I stretched the fabric over the dome and added water to where I had to stretch even more. Damp wool will stretch nicely and with little effort, but will not revert as a warning to the aspiring hat makers out there.

I haven’t lined the dome yet. I’m still thinking will the hat need some support system or elastics inside. To write this post I took a break from trying to figure how the shape of the, emm, curtain structure on the top is achieved. I’ve tried three different methods this far and I think it’s time to move on to mesh-wire-paper clay- direction.

Oh yeah, I finished the brooch! At least something is ready!

I could've take a photo of the finished thing with missing rings and attachment... Oh, well.

May 15, 2011

From pale to olive: Barriss make-up trial

"You call me pale?! Why don't you take a look in the mirror then..."

Four of our costumes have required more make-up than the basic foundation and enchantments. Mayuri was the first and he was followed by Jasdero and Debitto. From them we learned that for applying oil-based products you need damp sponge like with water-based ones. Not dry. You might quess that it took some time to apply the paint...

After realising that it was child’s play to create Samara’s look last Halloween. Even if we have some body paint stuff behind us, we never actually made try-outs with exception of Joxter's nose. By miracle they just have worked adequately. But we don’t like to settle for that with our new costumes, so we had a trial for our Mirialian chicks, more specifically for Barriss who will be portrayed by Yoki.


We had in mind of doing a tutorial, but because we didn’t have all the right products we decided to share our experience as a regular post. And the make-up isn’t that hard to do if you just have patience. The hardest thing is to apply the diamond shapes, but when good position is found for both the model and for the one doing the make-up it will go fast.


I started with the base. I applied Grimas’ Créme Make-Up with damp sponge. It’s best to tap the color on to avoid streaks. Then I fixed the paint with transparent fixing powder. I think we will buy tinted powder later on, because the white powder will catch flashes and make the skin look really pale, which I noticed after taking photos from the process. At this point the golden eye-shadow would be added, but we hadn’t purchased it yet.

Comfortable position is everything. Note the pillow started when I was 18 and never finished.


Then I started with liquid eye-liner. I used it for making the diamonds shapes on the nose and cheeks and lining the upper eyelid. Again the trial proved useful. Because the eye-liner was water soluble, it was rather hard to even get the color on, yet try to make the shapes sharp. I think three layers would do the trick. I did only two for the trial. For eyes I think I’ll use pencil eye-liner, it can be also added inside the lash line safely. That was actually my first idea and purpose, but the pencil was missing at the time we started the make-up.


Then I added black mascara, black lipstick and darkened Yoki’s eyebrows a little and we were done. It’s annoying how nice facial structure Yoki has; she actually looks pretty with the crazy make-up!

In all the process took about an hour. We’ll buy the products we missed and have another trial, possibly for Luminara's look. I also need to study my camera options more, because the photos Yoki's skin is pale compared to what it really looked like. Next to practising my make-up Barriss' also needs some more attention; the diamond shapes extend further on the cheeks.

May 13, 2011

Under construction: Barriss' cloak

During the last four evenings, the only sound that was heard was: thump thump thump thump thump thump thump and some unmentioned Finnish words which happened to escape our lips during the process. Indeed, it was time for printing Barriss' cloak fabric.

As I said, this project took four evenings, Hiron helped me out during the first two. We made one template out of soft plastic that was found from our local fabric store. The downside of this material was that it started to curl as the pattern had a lot of small strands in it. I got really frustrated with it while doing the final two lines, consisting 16 individual prints. But clearly I weren't as frustrated as Hiron during the first evening when it looked like the pattern was wrong, parts being too far apart from each other and the color was too light.

After going through most of her emotion arsenal, (the time I decided it was best to retreat) Hiron made a simple solution for the problem. She linked the small figures together with a brush, used more blue color in the mixture and finally pressed the wet print with a paper, removing the excess paint and making it more animate.

The template of doom!

There was another small problem with the template. After doing three lines, we noticed that the pattern started to look smaller and it was clearly missing parts. The paint had stuck on the template, closing the holes and making a nice layer on the plastic's surface which acted like a sticker tape. For this, there was a easier solution: a wash.

So after sitting, kneeling and lying on the floor for hours the print was finally finished, now only thing left to do is to create the network-like structure and put the cloak together.

Casualties: one telephone directory, yoki's right index finger and few stiff back muscles.

-yoki out

May 9, 2011

Typical situation with changing plans

Changing plans with costumes, conventions or schedules must be one of the most typical situations (or problems) amongst cosplayers. We are no exception. After Tampere Kuplii we unanimously dropped Bakacon from our convention list because of Yoki’s exams. Now, after being somewhat crippled for weeks first by back problems and now with swollen knee and notorious spring flu, I’m completely assured that it was the right choice.

As a duo, it’s really easy to tell the other party if a costume idea doesn’t appeal too much or if you've had a change of heart. Dropped and changed costume plans happen so casually between us that we don’t even remember to report them. I think our long-term readers have noticed that. If I were to count all the costumes we have thought about doing, the list would possibly be at least double the length of the list of the actual costumes.

Crazy things have been introduced here on our blog with our possible projects. Talking about lists, I thought I could make one and try to clear out what new costumes we are going to do for this summer:

Luminara Unduli and Barriss Offee from Star Wars: Attack of the Clones

That was short… These costumes we will wear at Desucon, which is the next convention we are going to attend to. Of course we have plans for the autumn, but at this point it’s too early to go there.

"I find the lack of your ergonomics, while constructing your lightsaber disturbing!"

May 5, 2011

Under construction: Luminara's cloth

Yesterday was the “May the fourth be with you”-day and I spend it according to theme; constructing Luminara’s accessories. This time I worked with the cloth she has attached to her belt. I managed to cut all the pieces and some I even prime painted. You could tell by looking around my apartment that the material I used for the cloth is craft foam. After months of static Finnfoam dust I’m happy with the some foam scraps wandering around.


I scaled the design from printed image and drew it on pattern paper. I traced the shapes on craft foam in two different colours. The markings and details I made with various objects and I’m using acrylics in brown, copper and gold. I still have much work ahead. Especially the detailing will be troublesome as there isn't many close-ups from the cloth.

During the upcoming week we are truly going to work with Luminara and Barriss as Yoki is having days off from school. We'll start printing the fabric for Barriss’ cape and hopefully finish the lightsaber hilts for both of us. I’m also trying to make some progress with Luminara’s headgear. I have started with it, but after realising how hard it is to find the right materials for it, I’ve just pushed it back.

We might also have some video stuff coming up.

April 26, 2011

Snowtrooper: Costume assembly

Our Snowtrooper costumes consist of sixteen different components per set: pants, shoes, knee plates, crotch piece, abdomen plate, pouches, thermal detonator holder, jacket, chest plate, shoulder straps, backpack, shoulder bells, arm guards, hand plates, gloves and helmet. In this post I will go through the fastenings and assembly.


The crotch piece has a plastic buckle on the side on a canvas strap. The buckle was placed on the side, because opening the buckle would have been hard to find the buckle under the cape with thermal detonator etc. on the way. The pouches have double loops and they hang on canvas belt, which goes through the abdomen plate. The belt has a plastic buckle on the side. The thermal detonator holder has two aluminum "loops" to keep it on place.


The knee plates has elastic band glued inside the outer edge of the piece. On the inner side and on the end of the elastic band is Velcro.


The shoulder straps are fastened to the chest plates with screws and nuts. Between the strap and the chest plate is craft foam cushioning, so that the parts would sit tightly and not scratch each other. The canvas straps of the chest plate suspenders and similar straps with D-rings for the backpack connects to the same screw. The harness is fastened with a plastic buckle on the back.

All the parts from the chest set. Here you can see how the chest itself is constructed from four pieces.

The arm guards have elastic bands on the wrist. The cuffs on the guards are craft foam. The palm plates attach to the gloves with Velcro as well as the shoulder bells to the jacket. The backpack has canvas straps with Velcro glued and screwed on it. The straps slip trough the D-rings when worn.


The helmet has cushioning on the forehead. The buckets are actually so form fitting that they don't need anything else. The visor is attached to the dome snugly with Velcro. I wanted the visors to be removable, if we ever needed to pack tightly: the domes can be stacked, like almost all of the armor parts in the costumes. That is also why the back cowl on the helmet is taped on and not glued.

Front.

Back obviously.

April 18, 2011

Under construction: Luminara's accessories

Next to leather gauntlets and cloth Luminara has few more accessories. She has a brooch fastening her cape on next to pair of belts and a lightsaber. The brooch I made last year already. I thought about re-making it, but after I examined the reference pictures I settled to it. There is still painting and weathering ahead, but I could say I'm on the winning side with it.

I've done lot of brain work with Luminara's belt buckles and few days ago I took the bull from its horns and started crafting. I've seen buckles that resemble the original ones, but never have I found exact copies. Nitpicky as I am, I had to get as close as possible. I have the simpler buckle done and fail-painted. The spray paint I used was really poor quality. I was able to get the bubbles out, which can still be seen in the picture. I'm going to paint it again with acrylics and trim the edges a little.


After painting the buckle, I need to weather it with black paint to give the design more depth. I also need to make the other, more difficult one and then come up with a fastening mechanism. I'm leaning forward to making the front of the belt “fake” and hiding the real buckle or snaps to the back, where the belt is covered by the cape. This way I would not need to worry about ruining the buckle while trying to make a tongue to it or about breaking the whole thing.


We have thought about applying to Rebel Legion with Luminara and Barriss, which makes having a lightsaber or the hilt of it necessary. I started constructing version 1 saber hilt a day prior to the buckles. The base is a carton tube from baking paper container and the covering is craft foam. There are insulation foam structures in both ends of the hilt. With the previous materials the hilt is really light, but looks neat. After covering it with glue I will paint it and add buttons and other required details.


As I stated the saber is just a version 1. If we get accepted to the Legion, we will make sabers with the blade later on. I also wanted to have little simpler props to work on now, because we are going to wear the costumes in two months and we will be busy on our own quarters for at least a month.

April 13, 2011

Snowtroopers got shot a bit

We didn’t take photos at Tampere Kuplii for few reasons: our pouches weren’t suitable for carrying my camera and we didn’t see that well under the helmets to actually get the model on the screen of Yoki's digital one. But Sunday morning we left our hotel early to take some photos of our costumes. Here is the outcome:

April 10, 2011

Back from Tampere Kupl-z-z-z

Home, sweet home, I say and send hearts to Yoki who needs to travel three hours more. But I bet we both are really happy with how the con went despite the tiredness. I will write more of how everything went from the last minute repairs to well rehearsed competition entry next week. Now I can hardly get this two paragraphs post ready. It has already taken ten minutes…

My Tusken impersonation. I'll also load the few photos we took next week.

I think this will only apply to the Finnish readers, but you can find an open voting on Aamulehti’s webpage for the best costume at Tampere Kuplii! Go and cast a vote!